In this final (unless I need to expand on the scenarios) part of the story, Flow will be used to take the information garnered from the user and create a work order.
Calling a Sub-flow
The original flow was all about Alexa, but what about other voice assistants? Flow is no different that any other programming languages and as such we can use the same concepts to writing decent flows, one of them being re-usability. If the code to write the Work order and book it is generic, it can be re-used when Google or Siri is connected to the application.
To this end, the Flow starts with another HTTP trigger, which is called from the previous flow.
Just like when connection Flow to Alexa, the URL is required in the child to update the caller. Create a new Flow, using the When a HTTP request is received. As content to the JSON Schema, add just enough to get you going and use the output to send an email so that the schema coming from the parent flow can be seen. This is a repart of the logic used to start our parent flow.
Once saved, the URL will be generated in the trigger step. Use this to call the child Flow from the parent. This is the HTTP action. The Method is a POST, the URI is the trigger URL defined in the child Flow. No headers are required. In the body, add in the things that are already known, just to ensure repeat calls to D365 are made. The Intent is also passed in, which has all the details about what the user wanted.
Now ready for testing, ensure both Flows are in Test mode and trigger Alexa. After a little delay, an email should be sent in the child Flow detailing enough information to create a Work Item.
Use this email to populate the JSON as previously, easily creating the schema that is required.
Creating a Work Order
Next, get the Account the contact is associated with. This is done with a call to the D365 Instance using the Common Data Service Connector.
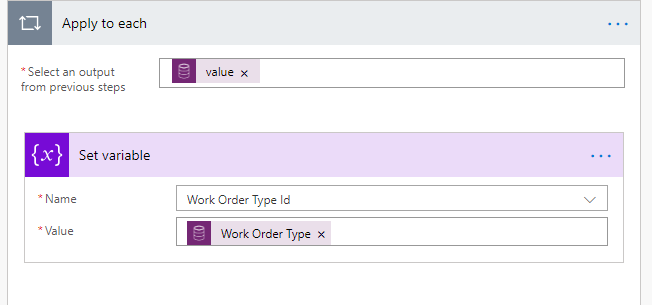
A Work Order needs some fields to be set before it can be save, Work Order Type is one of them. This could be hard coded, but Alexa has supplied the intent. To match the Work order type with the intention in Alexa, a field on the Work Order Type was added, Alexa Intent, which is searched for in the CDS List Records action.
To make the Flow easier to manage and reduce the dual looping, the Work Order Type is returned to a variable
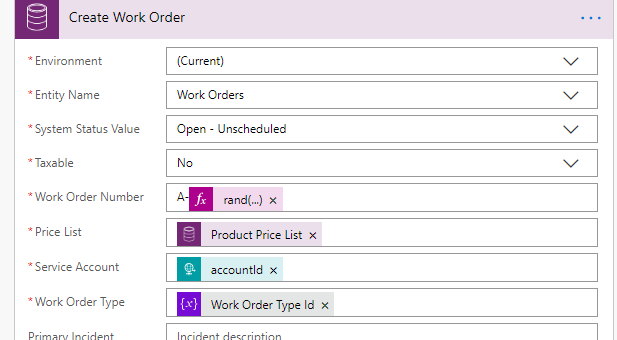
Once the data for the new Work Order is available, create the Work Order using the CDS Create Record connector.
Most of these are obvious, but the one that is not is the Work Order Number. In Field Service, this is automated, with a prefix and a number range. As this doesn’t work in Flow, a work number is generated using a random number, using an expression.
rand(10000,100000)
A few other parts of the work order are populated, helping the service manager to match the time as appropriate.
In this post I will be linking Alexa to D365 and returning some information back to the end user.
Receiving information from Alexa
Alexa interacts with the outside world with a HTTPS request. Once Alexa has determined that it understands the user and they have asked for something of your skill, it posts to the web service you have configured.
That API Guy had a great post where he links his Alexa to his O365 email account and has Alexa read out his new email. This article steps through linking Alexa and Flow, and it showed me how simple that part of the integration is. Microsoft has done the hard work by certifying it’s connections, you just need to create one.
Flow provides several methods of subscribing to HTTP events, but the one we are interested in is at the bottom
The URL is generated for you, and is the bit you need to post into Alexa Skill configuration once we have created the Flow. In the JSON schema, we just want a stub for now. The schema is defined by Alexa and how you configure the skill. It is best to get the connection up and running and use the initial call to substitute the schema later.
Every Flow needs at least one action to be able to save, so to aid testing and understand the JSON sent by Alexa, the first step is to send an email to myself with the content of the call.
Saving the flow and go back to the trigger
A specific trigger URL for our Flow is now generated.
Back in Alexa
In Alexa, on the left in the Skill is Endpoints. Alexa allows different endpoints to the skill depending on the Alexa region as well as a fall back. As this is a POC, using the default is appropriate.
The important part of this is the drop down below the URL copied from Flow, this needs to be the second option “My development endpoint is a sub-domain of a domain that has a wild card certificate from a certificate authority“. Basically, Microsoft has certified all their Flow endpoints with wild card certificates, allowing Amazon to trust that it is genuine.
One saved, Build your skill again. I found every time I touched any configuration or indeed anything in Alexa, I needed to rebuild.
Testing
Ready to test. Alexa allows you to test your connection via the Test tab within your skill.
You have to select Development from the drop down. You can also use this interface to check Production skills.
A word of warning, everytime you build, to test that new build, I found I had to re-select Development in this window by toggling between “Off” and “Development”.
Back in Flow, test your flow by confirming that you will conduct the action.
In the Test panel in Alexa, enter a phrase with your Invocation and Utterance in Alexa entry and if Alexa understands it is for your invocation, your flow should be triggered! Alexa will complain, as our simple flow hasn’t returned anything to it. We’ll worry about that later.
In our simple Flow, I used email as the action, as can be seen below.
This is the raw JSON output of the Alexa skill and this is used to tell Flow what to expect. This way it will provide the rest of the Flow with properties that are more appropriate.
Back in the Flow trigger, select Use sample payload to generate schema, which presents the text entry, where you paste in the email body.
Flow does the hard work now and presents you with a schema for what Alexa is sending your Flow
Authenticating the user
Taking triggers from Alexa, hence a user is all well and good, but they expect a rapid response. Alexa Skills are public domain once you publish it, anyone can enable your skill, hence a little work needs to be done to understand who is calling our skill and whether Big Energy Co supports them.
Which User is it?
The request from Alexa does include a unique reference of the user, but normally businesses like Big Energy Co work on email addresses, which you can get from Alexa, but the user has to give you permission. This can be pre-approved when the end user installs the skill or you can ask for approval.
Alexa needs to be told that your skill would like this permission. This allows Alexa to request this permission for you when your skill is enabled by the user
On the left hand menu, there is a Permissions link, where our skill asks for the email address
To ask Alexa for an users email address is a seperate web call with properties from original message sent from Alexa in the trigger.
Alexa provides each session an access token so that Flow can ask for more information from Alexa in the context of the users session, location, names, email etc. As this is a globally distributed system, the api End point can vary depending on where the user started their session. The URI at the end asks for the email address of the user of the session.
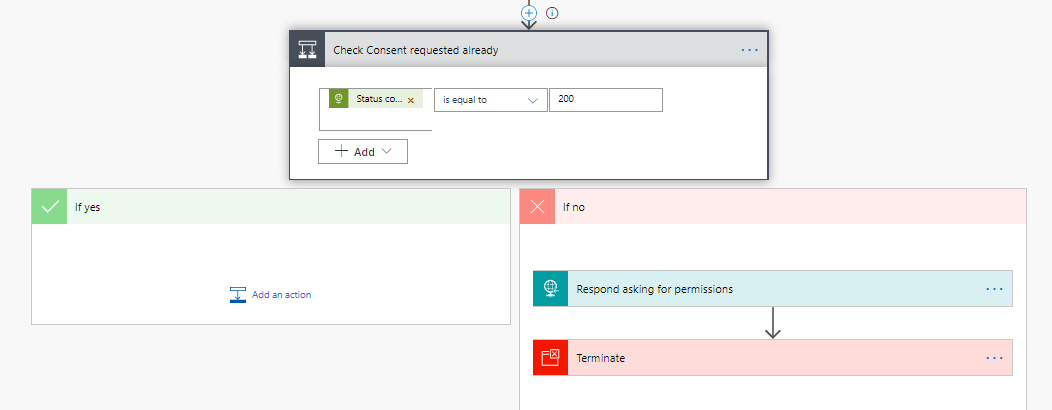
Alexa may refuse to return the email address, because the end user has not given permission for our skill to share this information. If the call to get the email was a success, it means that Alexa has returned the value and the Flow can continue
Without the permission, the call fails and so the Flow captures this. Remember to set a run after for this step to ensure it still runs on failure. Otherwise the flow will fail not so gracefully.
Alexa provides standard permission request functionality, the Flow responds to the original call with this detail in a JSON formatted string, with the permissions the Skill wants listed. Finally, for this failure, let the Flow terminate successfully. The Flow can’t continue without the information.
Does Big Energy Co support the user?
It is not enough that the user has asked us for help, they need to be known to Big Energy, as a contact. Querying D365 for this data is the next step
Using the D365 connector, query the contact entity for the email address that Alexa has given us.
A conditional flow checks to see if the return from the Retrieve Contact step has a single record using an expression below
length(body('Retrieve_Contact')?['value'])
Responding to the user, quickly
Like any Alexa Skill, the user expects an immediate response. Flow in itself is quick, but when it comes to updating or creating records, it can take seconds. The timeout for your response to Alexa is 10 seconds, which isn’t a lot when you want to look up several things to create the appropriate work order.
To get around this, respond to the user once you know you have all the information you need to create the appropriate records in D365. Here, the Flow responds if the contact is in our database. In production, you could do some more checks or just assume that if the contact is known, the logic could create an opportunity to sell them a contract if nothing else. Equally, terminate gracefully after responding that Big Energy Co doesnt know the customer, prompting them to ring the service desk.
In the switch statement, a response to the user is built up. Specific, personalised responses using the data you have retrieved is essential to give the customer an understanding that you have received the request and will respond.
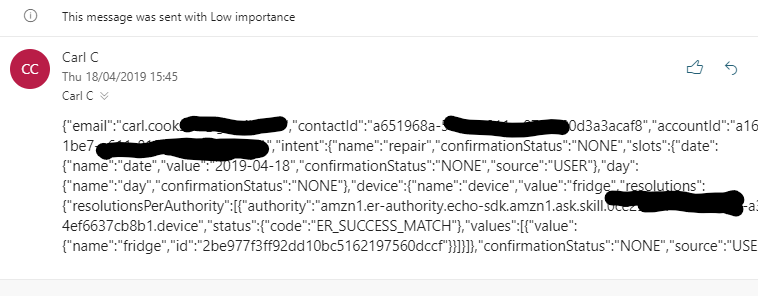
The responses are short and to the point but personalised to the customer and what they asked for with some expressions to add more information if they told Alexa.
This snippet adds after “request for a Service” what the user asked for a service on, relying on the JSON formatted values.
if(equals(triggerBody()?['request']?['intent']?['slots']?['device']?['value'], ''), '', concat(' for your ',triggerBody()?['request']?['intent']?['slots']?['device']?['value']))
This snippet adds to the end a sentence including the date that the user asked for.
if(equals(triggerBody()?['request']?['intent']?['slots']?['date']?['value'],''),'',concat( 'We will endeavour to send an engineer on ',triggerBody()?['request']?['intent']?['slots']?['date']?['value']))
Finally, for the Alexa response part, the Flow returns a response to the user. This combines the body with a little standard text. This is what Alexa will say. You can also add a response to the screen for those devices able to do that.
The final part of this flow goes on and creates the work order. I seperated out the flows using a sub flow, which is discussed in the next part of the blog.
As we all now have smart devices in our home, linking them to business applications could be a key differentiator between winners and the also rans. This series of posts will demonstrate how I connected Alexa to D365 Field service.
Our generic big energy company is diversifying into support and maintenance of home energy products, boilers, central heating, plumbing, electricals and numerous other aspects of a consumer’s home life. A client will ring up, tell the support desk that they have an issue with the appliance and the employee will book a suitable engineer in to come out to their home. This is all done via Field Service in D365. Big Energy also have scheduled servicing of Boilers on an annual basis.
What the CTO wants to do is embrace the in home virtual assistant to promote Big Energy as a forward thinking organisation which is at the forefront of technology to allow Big Energy’s customers to book an engineers visit via their smart device. Her expectation is that Alexa, Google Home or Siri will allow a service call to be booked without talking to the support desk. This will allow meaningful interactions with their customers 24/7.
The proof of concept will start with the front runner in the war of virtual assistance, mostly because I have one.
Alexa
If you have read my introduction to LUIS in Alexa Skill concepts are a mirror of the concepts introduced in LUIS. Alexa has Utterances & Intents. Entities are called Intent Slots for Alexa. Alexa has also got another concept, that being the Invocation.
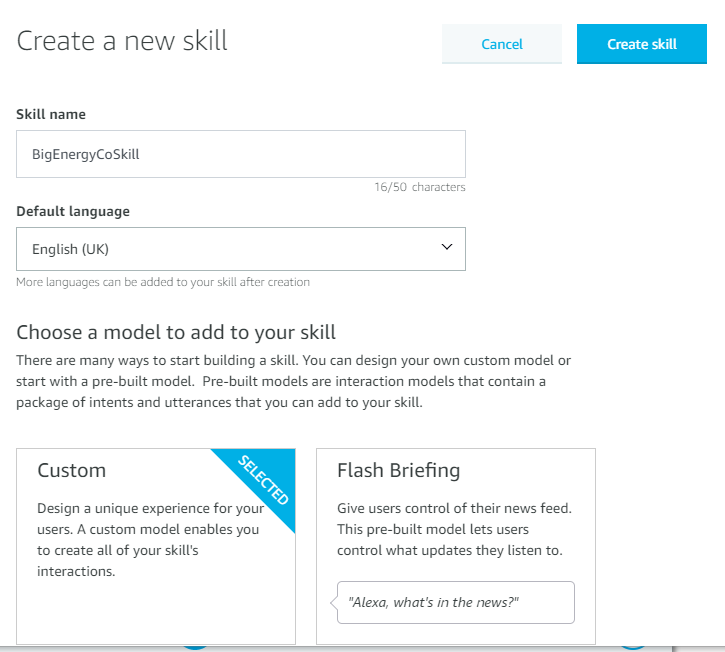
First off, get yourself an Amazon account & sign up for the developer program at developer.amazon.com. This is all free. People can buy skills, but not sure Big Energy’s customers would think this is appropriate.
Use the Create Skill button, enter a name & select a language. I also choose Custom & Provision your own to allow us to send data to Flow which is hosting our integration.
Then I select Start from scratch, none of the others seem to match our scenario
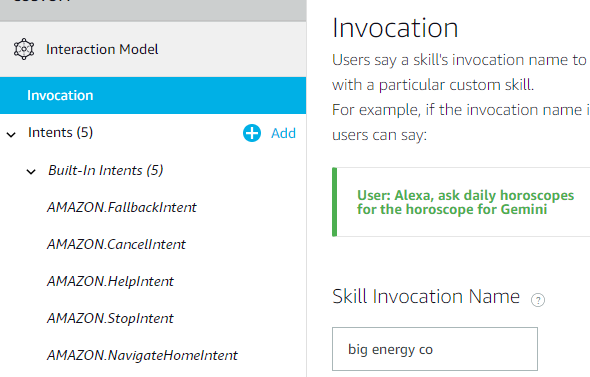
Invocation
An Invocation is the starting point and is the differentiator between you and every other Alexa skill out there. It is effectively a name for your skill, what the user would say to call your skill. I have slightly altered my invocation to put some spaces in there so it is more natural to the end user.
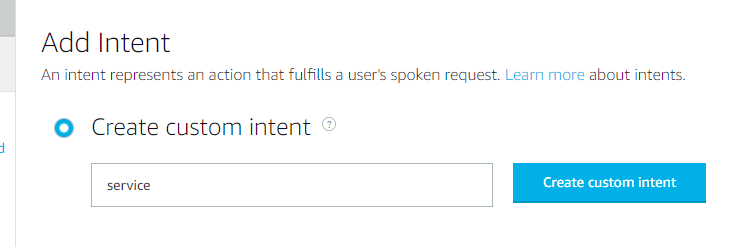
Intents
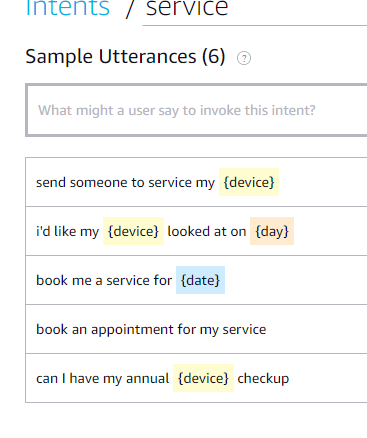
Like in LUIS, intents are a category or what the user is looking for or asking. You can have many intents per skill. In our scenario around home appliances the user can ask for a service, a repair or an emergency as a starting point. Let’s start with a request for service.
Utterances
Utterances are samples to train Alex to understand the intent in natural language. Add as many utterances as you like as samples of how a person would ask for a service or repair, but ensure they are different.
Slots
In my sample utterances above you can see I have added Slots. Slots are the same as entities in LUIS, data that the user gives us when they are saying their utterance in addition to the type of thing they want.
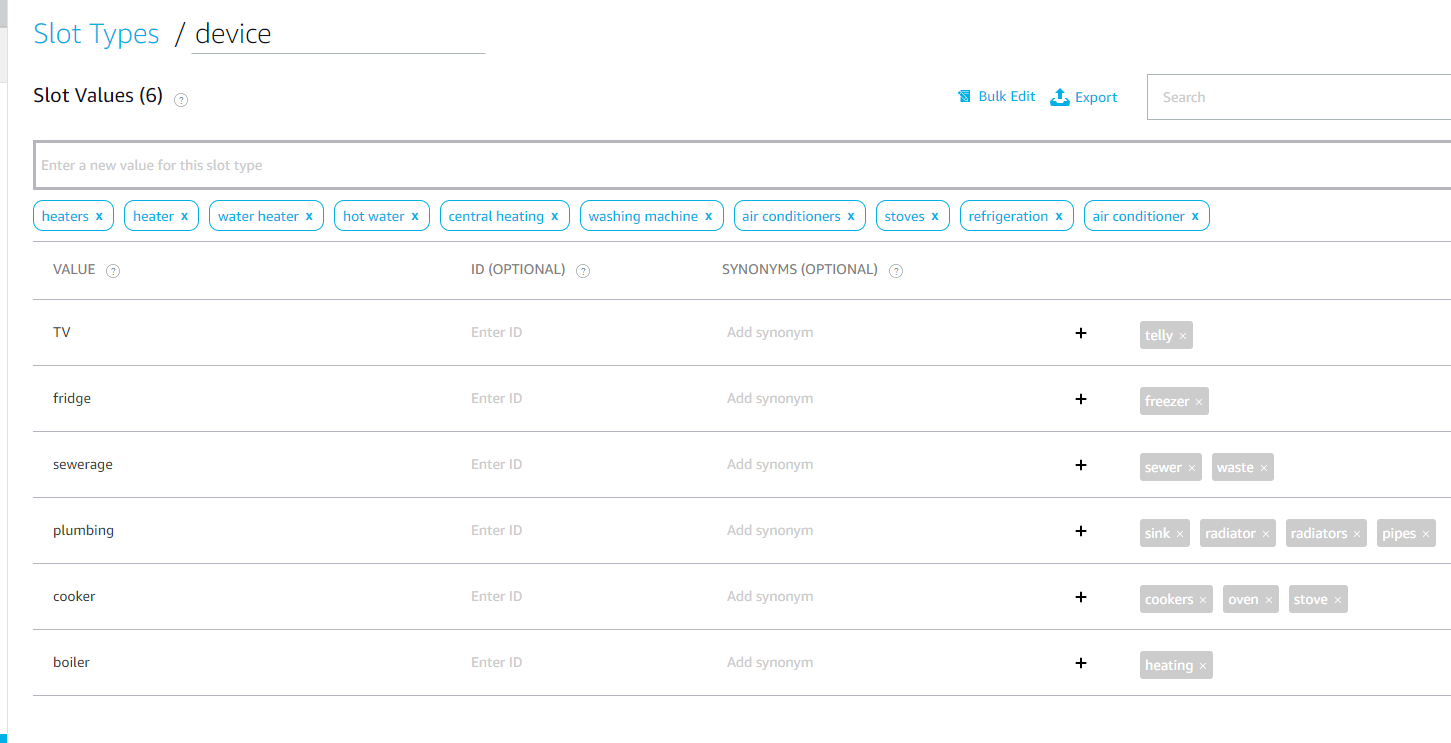
Each Slot has a type, and I have used the default Amazon types except for device, which is a custom one.
Slot Types
Amazon has 43 of it’s own list types or 6 built in types for numbers & dates, but devices are not in the list. I want to know what type of thing the engineer is going out to fix, not sure I need to be that specific, but would be good to know if I need to send an electrician, gas engineer or plumber. I have added my own Slot Type, called it device and I now list the values I expect.
You also should also enter synonyms, not everyone calls it a telly, just us northeners.
Once you have entered enough intents & utterances, time to build and test. A nice message lets you know when it is done building. Ready for the utterance profiler or testing
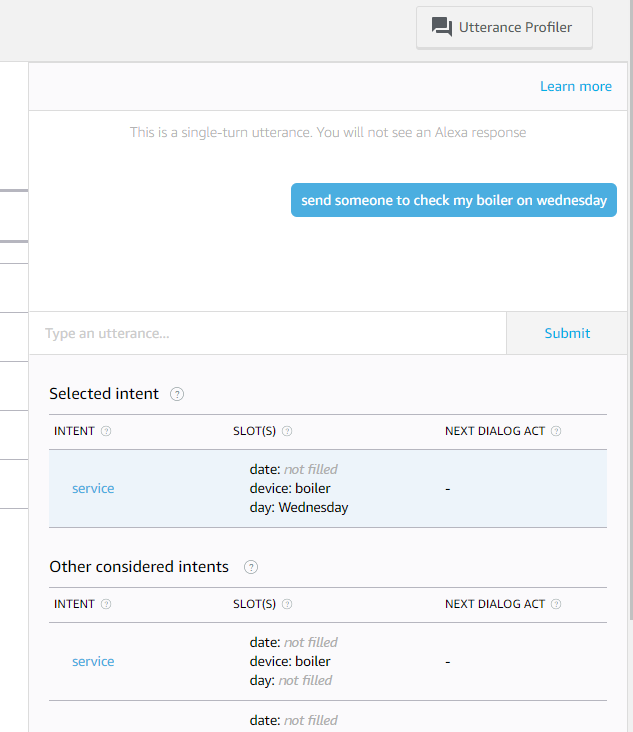
Utterance Profiler
In the top right, is a pop out to test your utterances. Enter an utterance you haven’t used before to check you are getting the expected results.
The text I wrote is in blue, it has decided that this is a service intent, with a device of boiler & the day of wednesday.
You can carry on fine tuning your utterances, intents and slots to get the most accurate model. Like any language understanding, this will be an ongoing model.
This is Alexa done, we have configured everything we need to in Alexa, apart from our link to Flow. This needs a bit of pre-work in Flow to activate, in the next post.
In my previous post, the fact that I had to “fudge” the routing and closure of the case irked me. Whilst at D365 EU Summit in Amsterdam, I spent an hour listening to Serge Luca (his excellent blog is here). He inspired me to think that we could close this loop using a Custom Connector in Flow connected to our D365 instance, allowing an API call directly to the closure action.
Back in the UK, I did some digging, found another excellent blog from Andrew Butenko which steps through doing this for Won Opportunity here, so just to complete the circle I will step through how I did this.
Create the App in Azure
This is a bit heavy for a citizen developer & in the real world you will have to ask your O365 admin to do this, but in my trail I have the appropriate access.
Go to portal.azure.com & log in using your CRM Admin credentials.
In the left pane, select Azure Active Directory, then App Registrations (Preview) then New registration. Give it a name, select Accounts in this organizational directory only & enter localhost as a temporary redirect URL, this will change later. Select Register & allow Azure to do it’s stuff
On the next screen, select API Permissions, then Add a permission
The one we are interested in is Dynamics CRM. Select it.
Check the box next to user_impersonation. Select Add permissions & now you should have 2 permissions for your new application. Now we need to ensure only we can access it.
In Certificates & secrets, select New client secret. Give it a Description and decide how long you want to wait before it expires. Not an issue for our demo, our trial wont last as long as this expiry. Once created, make sure you copy the value information, you won’t be able to retrieve this at a later stage.
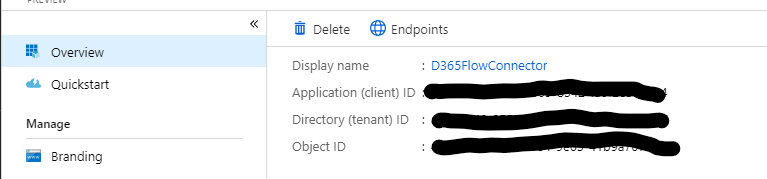
We also need the application id, this is available on the Overview tab
Create a Custom Connector
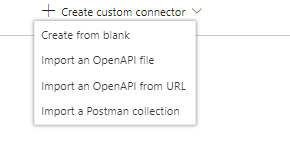
Back in flow, under Data & then Custom Connectors there is a Create custom connector drop down, select Create from blank and give it a name.
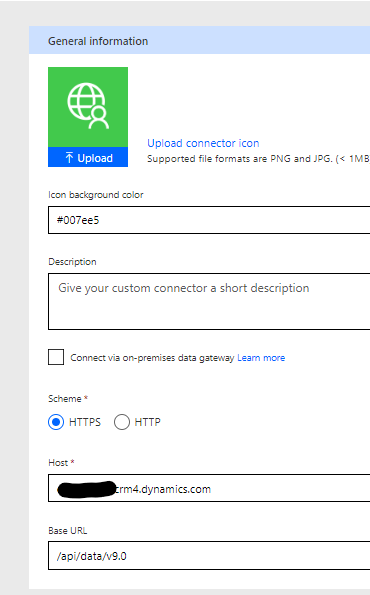
On the next screen, you can customise the description & logo if you want, but the important bit is the Host, which is your instance url, and the Base URL which is the api access path.
Select Security next & choose OAuth 2.0. Identity Provider should be Azure Active Directory, Client Id is the Application Id from previous & Client Secret is also from the previous step. Login URL, Tenant ID & Scope should be left to their default. Resource URL is the url to your environment.
Save the connector by using the Update Connector now. There is an important piece of information, the Redirect URL, which we have to copy & add to our connector back in Azure.
Select the App Registration in Azure, select Redirect URIs
Add a new one from your copied redirect (I think it is standard, as I have only seen one, but just to be sure)
The next screen allows you to add Actions & triggers. I think there could be a whole new blog post on using triggers this way. As custom connector is generic across all apis, the flexibility is great. Select New Action.
The General section describes the connector in Flow, so useful but nothing special is required apart from the Operation Id, which is what api action you want to call & must be unique within each connector.
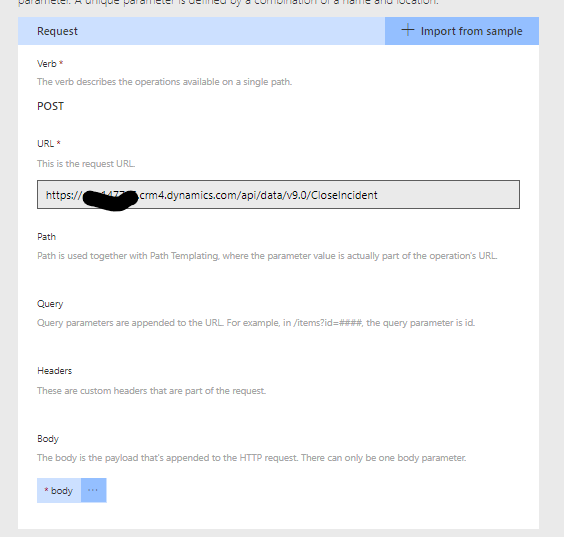
Select Import from sample. This would usually be a sample JSON function. I built mine using Postman, and this is a bit more than a citizen developer would be able to handle without experience. Federico Jousset has a great blog post on using Postman to “play” with D365 end points, including a link to an extensive Postman collection with lots of examples which were the key to understanding the call, particularly the parameters.
When you hit import, you will get this section under Request. The bit we are interested in is at the bottom, the body.
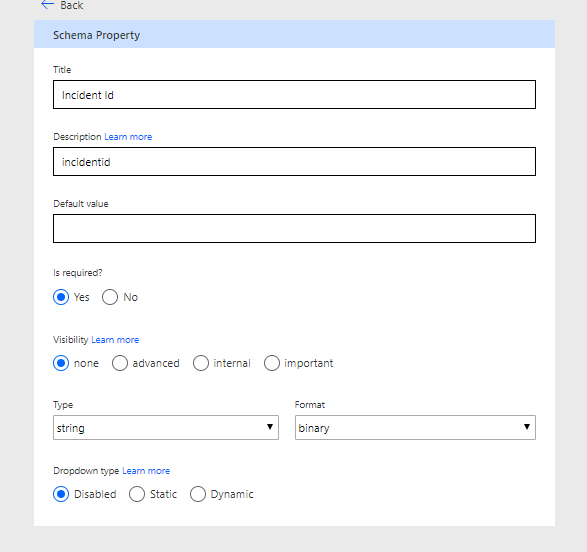
Click on body, then edit you will see a list of the parameters that Flow inferred from the sample body we gave it.
Select Incident Id for example, we can now give it a little more information & more importantly give the end user of the low more information with the Title & default value & whether it is required
We are now ready to Test. Select the test button, choose New Connection & connect to your D365 system. Enter the appropriate values, but be careful over the incident Id, as it is expecting a odata conversion. Someone better at connectors could tell me why.
If everything is good, you will get a blank body response back, as this is how the CloseIncident works
Using the connector in Flow
In the previous article, I showed you how we had to use a custom field & workflow in D365 to close the incident. I can now replace that with my custom connector call
Where I was updating a record because they were asking for their next bill, I remove the change to the CloseByFlow field and replace it with a seperate call
In Flow, I add a new action, select the Custom Tab, my connector & the action I want, this case the CloseIncident. We need to mimic how the api is expceting the Case Id to be passed, which is why we send with the ‘/incidents(‘ prefix & ‘)’ suffix.
Test the flow & we have now completed the scenario. Case closure is now part of the flow.
Custom connectors are new for Flow & give the Flow creator that step extra of functionality where the OOTB solutions don’t work.
There is a word of caution about licensing here, I have been using a trial of E5, which gives you Flow for Office 365 License. I can create a custom connector to a standard application but not a custom application with it. This is the same for Flow for Dynamics 365, so I don’t need an extra license, but be warned.
In this 3rd installment of the series devoted to using Language Understanding (LUIS) to categorise emails via Flow, I will describe some of the parts of the D365 solution and walk through a final version of the Flow to extend its capabilities.
This blog has at least 3 parts, but overall the posts objectives are
Give you an understanding of a real-life scenario where we could implement LUIS – (Part 1)
Discuss the Microsoft Flow to connect LUIS to D365 (Part 2)
Give you some next steps on how you can try to bring LUIS into your organisation
Routing the case
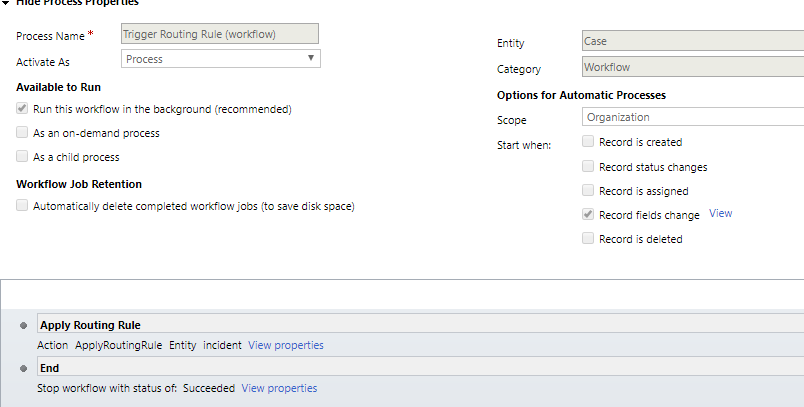
Standard Save and Route functionality only fires automatically on case creation, or when a user manually hits the button. This action is available in workflow, but not in the CRUD actions of the D365 or CDS connectors. To get around this there is a workflow triggered of the change of the subject field which calls the OOTB action ApplyRoutingRule. This effectively is the same as the user clicking the button.
The routing rules are very simple, routing the case based on the subject selected.
Adding information from the case
In our scenario, based around a support desk for a large power company, one of the common requests is to provide meter readings. This data is invaluable.
In LUIS, this information is called an Entity. You can configure entities for each of the Intents to denote some parcel of information that the user is telling you on top of the intent of their email.
As you start typing and enter data, LUIS recognises this and replaces the data with a data type that it will use.
In Flow, the return from LUIS will contain a list of all the entities it has found in your utterance. The flow then updates the case with this defined data, in a separate field on the case record.
The first part of the flow checks the length of the array of entities that LUIS returned. If there are no entities, then just do a normal update of the case record. If there are entities, loop through them
As the entities array is looped through, check that the entity is a number. LUIS could return you a date or name. If it is not a number, just do a normal update of the record.
If it is a number, pass the meter reading to the case update in the new field on the Case entity.
This approach does lead to duplicate updates, 1 for each entity it finds. You may be better suited to extend the logic in a production system to prevent this.
Auto-reply for common intents
In our scenario, one of the common requests that the help desk gets is to ask when the end user is due a bill. This again could be dealt with in numerous ways via workflow in D365, but doing it in Flow allows the demonstration of Flow’s abilities.
The first part is to check the Top scoring intent is “Next Bill due”. The flow goes on to check for meter readings if it isn’t.
Using D365 connector this time (Microsoft changes so quickly, it is hard to keep up with what the best methods are) I retrieve the contact that created the case then send them a nicely formatted email. This will send the email as the account you attach to run the flow, in our scenario the support desk. I have only hardcoded the content here, but you could easily read the date of the next bill from the users account record or something similar.
The next step is close the case as we have provided the end user with the appropriate information. In D365, this is another action not readily available via the CRUD of the CDS or D365 connector.
I now realise, after attending the EU D365 User Group Summit that this would be possible via Flow, along with routing the case, if you create your own custom connector and associate that with your D365 API instance, but that’s for another post.
To get round the limitations, a new field is populated on the Case record, Close from Flow.
A workflow is then triggered when this field changes to call the OOTB action if the value is true.
Sentiment analysis
One of the big uses for social engagement and monitoring is to assess sentiment in the comments made by customers. LUIS provides this information in a textual (positive, neutral or negative) as well as numeric form if enable it on the application.
Once you have this configured, recording this against the case and maybe setting a priority on it’s value would be quite straight forward.